What is VIM ?
Behind this obscure name is a powerful text editor that runs in the terminal. No need for any graphic user interface (GUI) to use it. Vim is like an old man among text editor. It is a derivative of Vi, born in 1976. There was no graphic user interface available to the public at the time. Step by step it improved with implementation of syntax coloring and its own configuration language, VimScript, used to write plugins and make it a true IDE with some patience.
What’s the point of using it today ?
- Vim is very lightweight. It doesn’t need any GUI and does not index all your project at launch. It can run on an old or minimalist machine.
- Vim is everywhere : on every UNIX family system (Linux, MacOS, BSD…) it can be found. There is also a Windows version. That means it is present on most remote server you’ll have to intervene on.
- Vim is efficient as a productivity tool. At first though, learning it will demand some perseverance. It allows you to launch shell commands without quitting it or changing tab. The key (lol) point of Vim is to dev without touching your mouse.
A quick glance at Vim modes
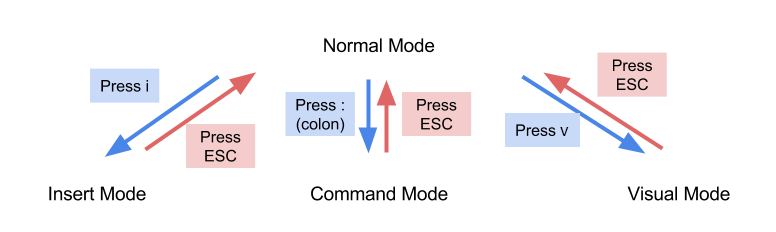
So you opened Vim before reading this whole article and you’d like to know how to start navigating it ? Here are some commands.
| Touches | |
| :q | Quit |
| :w | Write the file |
| :[command]! | Force the [command] (override warning) |
| I | Insert mode |
| Esc | Back to normal mode |
| V | Visual mode |
| /[expression] | Search [expression] in the file. N for next, Maj+N for previous |
| :![cmd] | Pass [cmd] to shell |
| H / J / K / L | left / down / up / right |
Commands must be launched from normal mode. It is possible to combine commands, like :
:wq!To write file and then force close Vim. To go further in the base commands and the Vim basics, install and launch Vimtutor and follow its instructions :
sudo apt install vimtutorMinimal .vimrc file example
This conf will activate syntax color, line numbers, mouse support (boooh !), automatic line break and 4 spaces indentation among others. .vimrc is located under ~ (your personal folder in Unix systems). It’s a hidden file. Open it with Vim :
sudo vi ~/.vimrcAnd add the following :
set nocompatible
syntax on
filetype plugin indent on
set mouse=a
set number
set laststatus=2 ignorecase smartcase hlsearch incsearch

" show existing tab with 4 spaces width
set tabstop=4
" soft tab width
set softtabstop=4
set shiftwidth=4
" 4 spaces tab
set expandtab

autocmd BufNewFile,BufRead *.ezt set filetype=html

" Vanilla key remapping PREVIOUS - NEXT
:nnoremap <C-n> :bnext<CR>
:nnoremap <C-p> :bprevious<CR>

" indentation made from visual mode
set smartindent
Pathogen plugins manager
Install Pathogen with the following :
mkdir -p ~/.vim/autoload ~/.vim/bundle && curl -LSso ~/.vim/autoload/pathogen.vim https://tpo.pe/pathogen.vimSee project’s tree structure with NERDtree
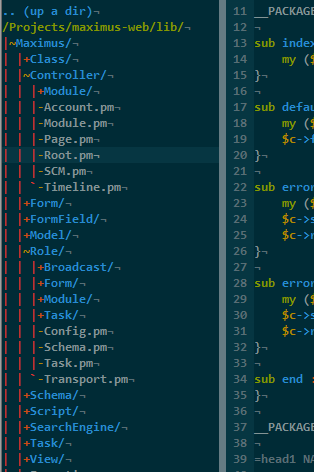
cd ~/.vim/bundles
git clone https://github.com/scrooloose/nerdtree.git ~/.vim/bundle/nerdtree
Then add the following to your .vimrc :
"NERDtree auto refresh on file save
autocmd BufWritePost * NERDTreeFocus | execute 'normal R' | wincmd p
let NERDTreeShowHidden=1

" Close NERDtree if last buffer
autocmd bufenter * if (winnr("$") == 1 && exists("b:NERDTree")) | q | endif
Relaunch vim and it should be present. To switch between NERDtree and the editor, press W two times. When your cursor is on a file or folder, double press M to see available actions.
YouCompleteMe for autocompletion
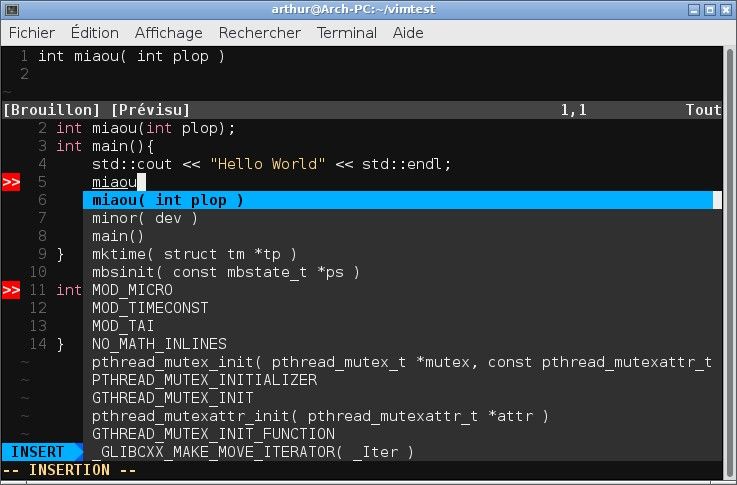
This plugins uses what you already typed to make suggestions. Before editing your .vimrc, launch the following :
sudo apt-get install vim-gui-common
sudo apt-get install vim-runtime
Then install YCM itself :
sudo apt install build-essential cmake python3-dev python2.7-dev
cd ~/.vim/bundle && git clone https://github.com/Valloric/YouCompleteMe
cd ~/.vim/bundle/YouCompleteMe
git submodule update --init --recursive
python3 install.py
Check the github repository for more info.
Enhance Vim status bar with Lightline

Run the following in your shell :
git clone https://github.com/itchyny/lightline.vim ~/.vim/bundle/lightline.vimThen add the following in .vimrc to display current Git branch :
" Display Git branch in status bar
let g:lightline = {
      \ 'active': {
      \   'left': [ [ 'mode', 'paste' ],
      \             [ 'gitbranch', 'readonly', 'filename', 'modified' ] ]
      \ },
      \ 'component_function': {
      \   'gitbranch': 'gitbranch#name'
      \ },
      \ }
PHPComplete, true CTags based autocompletion
First install ctags from your shell :
curl -Ss http://vim-php.com/phpctags/install/phpctags.phar > phpctags
cd your-project-folder
php ./phpctags
ctags -R --fields=+aimlS --languages=php
You can also make Vim index your project with gutentags :
cd ~/.vim/bundle
git clone https://github.com/ludovicchabant/vim-gutentags.git
And finally install PHPComplete plugin :
cd ~/.vim/bundle
git clone git://github.com/shawncplus/phpcomplete.vim.git
Edit .vimrc to enable it :
set omnifunc=syntaxcomplete#Complete
autocmd FileType php setlocal omnifunc=phpcomplete#CompletePHP
" setup vim tag file
set tags=tags;/

augroup MyGutentagsStatusLineRefresher
    autocmd!
    autocmd User GutentagsUpdating call lightline#update()
    autocmd User GutentagsUpdated call lightline#update()
augroup END
Twig support
cd ~/.vim/bundle/
git clone https://github.com/evidens/vim-twig.git
Final words
Check Vimawesome website to see existing plugins for Vim. This tutorial used Pathogen as a plugin manager.
